Note
Click here to download the full example code
Object Detection From TF2 Checkpoint
This demo will take you through the steps of running an “out-of-the-box” TensorFlow 2 compatible detection model on a collection of images. More specifically, in this example we will be using the Checkpoint Format to load the model.
Download the test images
First we will download the images that we will use throughout this tutorial. The code snippet
shown bellow will download the test images from the TensorFlow Model Garden
and save them inside the data/images folder.
import os
os.environ['TF_CPP_MIN_LOG_LEVEL'] = '2'    # Suppress TensorFlow logging (1)
import pathlib
import tensorflow as tf

tf.get_logger().setLevel('ERROR')           # Suppress TensorFlow logging (2)

# Enable GPU dynamic memory allocation
gpus = tf.config.experimental.list_physical_devices('GPU')
for gpu in gpus:
    tf.config.experimental.set_memory_growth(gpu, True)

def download_images():
    base_url = 'https://raw.githubusercontent.com/tensorflow/models/master/research/object_detection/test_images/'
    filenames = ['image1.jpg', 'image2.jpg']
    image_paths = []
    for filename in filenames:
        image_path = tf.keras.utils.get_file(fname=filename,
                                            origin=base_url + filename,
                                            untar=False)
        image_path = pathlib.Path(image_path)
        image_paths.append(str(image_path))
    return image_paths

IMAGE_PATHS = download_images()
Download the model
The code snippet shown below is used to download the pre-trained object detection model we shall use to perform inference. The particular detection algorithm we will use is the CenterNet HourGlass104 1024x1024. More models can be found in the TensorFlow 2 Detection Model Zoo. To use a different model you will need the URL name of the specific model. This can be done as follows:
Right click on the Model name of the model you would like to use;
Click on Copy link address to copy the download link of the model;
Paste the link in a text editor of your choice. You should observe a link similar to
download.tensorflow.org/models/object_detection/tf2/YYYYYYYY/XXXXXXXXX.tar.gz;Copy the
XXXXXXXXXpart of the link and use it to replace the value of theMODEL_NAMEvariable in the code shown below;Copy the
YYYYYYYYpart of the link and use it to replace the value of theMODEL_DATEvariable in the code shown below.
For example, the download link for the model used below is: download.tensorflow.org/models/object_detection/tf2/20200711/centernet_hg104_1024x1024_coco17_tpu-32.tar.gz
# Download and extract model
def download_model(model_name, model_date):
    base_url = 'http://download.tensorflow.org/models/object_detection/tf2/'
    model_file = model_name + '.tar.gz'
    model_dir = tf.keras.utils.get_file(fname=model_name,
                                        origin=base_url + model_date + '/' + model_file,
                                        untar=True)
    return str(model_dir)

MODEL_DATE = '20200711'
MODEL_NAME = 'centernet_hg104_1024x1024_coco17_tpu-32'
PATH_TO_MODEL_DIR = download_model(MODEL_NAME, MODEL_DATE)
Download the labels
The coode snippet shown below is used to download the labels file (.pbtxt) which contains a list
of strings used to add the correct label to each detection (e.g. person). Since the pre-trained
model we will use has been trained on the COCO dataset, we will need to download the labels file
corresponding to this dataset, named mscoco_label_map.pbtxt. A full list of the labels files
included in the TensorFlow Models Garden can be found here.
# Download labels file
def download_labels(filename):
    base_url = 'https://raw.githubusercontent.com/tensorflow/models/master/research/object_detection/data/'
    label_dir = tf.keras.utils.get_file(fname=filename,
                                        origin=base_url + filename,
                                        untar=False)
    label_dir = pathlib.Path(label_dir)
    return str(label_dir)

LABEL_FILENAME = 'mscoco_label_map.pbtxt'
PATH_TO_LABELS = download_labels(LABEL_FILENAME)
Load the model
Next we load the downloaded model
import time
from object_detection.utils import label_map_util
from object_detection.utils import config_util
from object_detection.utils import visualization_utils as viz_utils
from object_detection.builders import model_builder

PATH_TO_CFG = PATH_TO_MODEL_DIR + "/pipeline.config"
PATH_TO_CKPT = PATH_TO_MODEL_DIR + "/checkpoint"

print('Loading model... ', end='')
start_time = time.time()

# Load pipeline config and build a detection model
configs = config_util.get_configs_from_pipeline_file(PATH_TO_CFG)
model_config = configs['model']
detection_model = model_builder.build(model_config=model_config, is_training=False)

# Restore checkpoint
ckpt = tf.compat.v2.train.Checkpoint(model=detection_model)
ckpt.restore(os.path.join(PATH_TO_CKPT, 'ckpt-0')).expect_partial()

@tf.function
def detect_fn(image):
    """Detect objects in image."""

    image, shapes = detection_model.preprocess(image)
    prediction_dict = detection_model.predict(image, shapes)
    detections = detection_model.postprocess(prediction_dict, shapes)

    return detections

end_time = time.time()
elapsed_time = end_time - start_time
print('Done! Took {} seconds'.format(elapsed_time))
Out:
Loading model... Done! Took 0.506481409072876 seconds
Load label map data (for plotting)
Label maps correspond index numbers to category names, so that when our convolution network predicts 5, we know that this corresponds to airplane. Here we use internal utility functions, but anything that returns a dictionary mapping integers to appropriate string labels would be fine.
category_index = label_map_util.create_category_index_from_labelmap(PATH_TO_LABELS,
                                                                    use_display_name=True)
Putting everything together
The code shown below loads an image, runs it through the detection model and visualizes the detection results, including the keypoints.
Note that this will take a long time (several minutes) the first time you run this code due to tf.function’s trace-compilation — on subsequent runs (e.g. on new images), things will be faster.
Here are some simple things to try out if you are curious:
Modify some of the input images and see if detection still works. Some simple things to try out here (just uncomment the relevant portions of code) include flipping the image horizontally, or converting to grayscale (note that we still expect the input image to have 3 channels).
Print out detections[‘detection_boxes’] and try to match the box locations to the boxes in the image. Notice that coordinates are given in normalized form (i.e., in the interval [0, 1]).
Set
min_score_threshto other values (between 0 and 1) to allow more detections in or to filter out more detections.
import numpy as np
from PIL import Image
import matplotlib.pyplot as plt
import warnings
warnings.filterwarnings('ignore') # Suppress Matplotlib warnings
def load_image_into_numpy_array(path):
"""Load an image from file into a numpy array.
Puts image into numpy array to feed into tensorflow graph.
Note that by convention we put it into a numpy array with shape
(height, width, channels), where channels=3 for RGB.
Args:
path: the file path to the image
Returns:
uint8 numpy array with shape (img_height, img_width, 3)
"""
return np.array(Image.open(path))
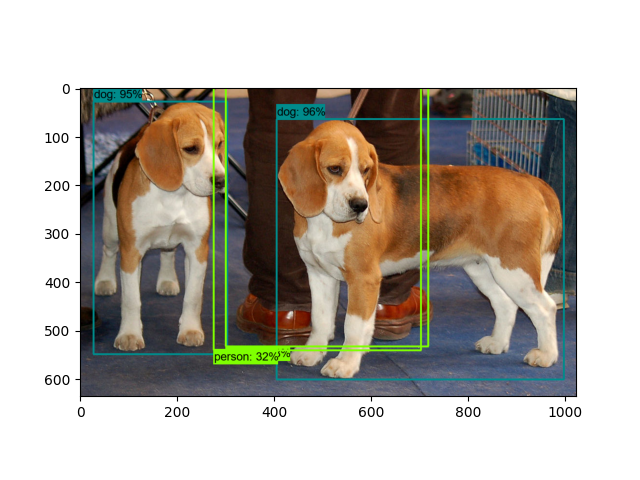
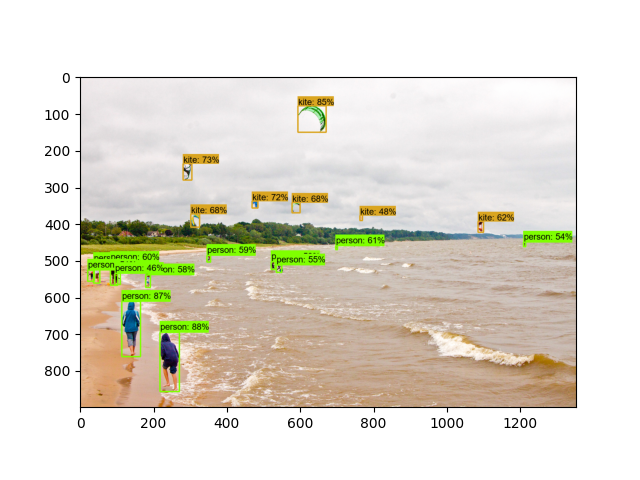
for image_path in IMAGE_PATHS:
print('Running inference for {}... '.format(image_path), end='')
image_np = load_image_into_numpy_array(image_path)
# Things to try:
# Flip horizontally
# image_np = np.fliplr(image_np).copy()
# Convert image to grayscale
# image_np = np.tile(
# np.mean(image_np, 2, keepdims=True), (1, 1, 3)).astype(np.uint8)
input_tensor = tf.convert_to_tensor(np.expand_dims(image_np, 0), dtype=tf.float32)
detections = detect_fn(input_tensor)
# All outputs are batches tensors.
# Convert to numpy arrays, and take index [0] to remove the batch dimension.
# We're only interested in the first num_detections.
num_detections = int(detections.pop('num_detections'))
detections = {key: value[0, :num_detections].numpy()
for key, value in detections.items()}
detections['num_detections'] = num_detections
# detection_classes should be ints.
detections['detection_classes'] = detections['detection_classes'].astype(np.int64)
label_id_offset = 1
image_np_with_detections = image_np.copy()
viz_utils.visualize_boxes_and_labels_on_image_array(
image_np_with_detections,
detections['detection_boxes'],
detections['detection_classes']+label_id_offset,
detections['detection_scores'],
category_index,
use_normalized_coordinates=True,
max_boxes_to_draw=200,
min_score_thresh=.30,
agnostic_mode=False)
plt.figure()
plt.imshow(image_np_with_detections)
print('Done')
plt.show()
# sphinx_gallery_thumbnail_number = 2
Out:
Running inference for C:\Users\sglvladi\.keras\datasets\image1.jpg... Done
Running inference for C:\Users\sglvladi\.keras\datasets\image2.jpg... Done
Total running time of the script: ( 0 minutes 20.819 seconds)