Installation
General Remarks
There are two different variations of TensorFlow that you might wish to install, depending on whether you would like TensorFlow to run on your CPU or GPU, namely TensorFlow CPU and TensorFlow GPU. I will proceed to document both and you can choose which one you wish to install.
If you wish to install both TensorFlow variants on your machine, ideally you should install each variant under a different (virtual) environment. If you attempt to install both TensorFlow CPU and TensorFlow GPU, without making use of virtual environments, you will either end up failing, or when we later start running code there will always be an uncertainty as to which variant is being used to execute your code.
To ensure that we have no package conflicts and/or that we can install several different versions/variants of TensorFlow (e.g. CPU and GPU), it is generally recommended to use a virtual environment of some sort. For the purposes of this tutorial we will be creating and managing our virtual environments using Anaconda, but you are welcome to use the virtual environment manager of your choice (e.g. virtualenv).
Install Anaconda Python 3.7 (Optional)
Although having Anaconda is not a requirement in order to install and use TensorFlow, I suggest doing so, due to it’s intuitive way of managing packages and setting up new virtual environments. Anaconda is a pretty useful tool, not only for working with TensorFlow, but in general for anyone working in Python, so if you haven’t had a chance to work with it, now is a good chance.
Run the downloaded executable (
.exe) file to begin the installation. See here for more details.(Optional) In the next step, check the box “Add Anaconda to my PATH environment variable”. This will make Anaconda your default Python distribution, which should ensure that you have the same default Python distribution across all editors.
Run the downloaded bash script (
.sh) file to begin the installation. See here for more details.When prompted with the question “Do you wish the installer to prepend the Anaconda<2 or 3> install location to PATH in your /home/<user>/.bashrc ?”, answer “Yes”. If you enter “No”, you must manually add the path to Anaconda or conda will not work.
TensorFlow Installation
As mentioned in the Remarks section, there exist two generic variants of TensorFlow, which utilise different hardware on your computer to run their computationally heavy Machine Learning algorithms.
The simplest to install, but also in most cases the slowest in terms of performance, is TensorFlow CPU, which runs directly on the CPU of your machine.
Alternatively, if you own a (compatible) Nvidia graphics card, you can take advantage of the available CUDA cores to speed up the computations performed by TensorFlow, in which case you should follow the guidelines for installing TensorFlow GPU.
TensorFlow CPU
Getting setup with an installation of TensorFlow CPU can be done in 3 simple steps.
Important
The term Terminal will be used to refer to the Terminal of your choice (e.g. Command Prompt, Powershell, etc.)
Create a new Conda virtual environment (Optional)
Open a new Terminal window
Type the following command:
conda create -n tensorflow_cpu pip python=3.7
The above will create a new virtual environment with name
tensorflow_cpuNow lets activate the newly created virtual environment by running the following in the Terminal window:
activate tensorflow_cpu
Once you have activated your virtual environment, the name of the environment should be displayed within brackets at the beggining of your cmd path specifier, e.g.:
(tensorflow_cpu) C:\Users\sglvladi>
Install TensorFlow CPU for Python
Open a new Terminal window and activate the tensorflow_cpu environment (if you have not done so already)
Once open, type the following on the command line:
pip install --ignore-installed --upgrade tensorflow==1.14
Wait for the installation to finish
Test your Installation
Open a new Terminal window and activate the tensorflow_cpu environment (if you have not done so already)
Start a new Python interpreter session by running:
pythonOnce the interpreter opens up, type:
>>> import tensorflow as tf
If the above code shows an error, then check to make sure you have activated the tensorflow_cpu environment and that tensorflow_cpu was successfully installed within it in the previous step.
Then run the following:
>>> hello = tf.constant('Hello, TensorFlow!')
>>> sess = tf.Session()
Once the above is run, if you see a print-out similar (or identical) to the one below, it means that you could benefit from installing TensorFlow by building the sources that correspond to you specific CPU. Everything should still run as normal, but potentially slower than if you had built TensorFlow from source.
2019-02-28 11:59:25.810663: I T:\src\github\tensorflow\tensorflow\core\platform\cpu_feature_guard.cc:141] Your CPU supports instructions that this TensorFlow binary was not compiled to use: AVX2
Finally, run the following:
>>> print(sess.run(hello))
b'Hello, TensorFlow!'
TensorFlow GPU
The installation of TensorFlow GPU is slightly more involved than that of TensorFlow CPU, mainly due to the need of installing the relevant Graphics and CUDE drivers. There’s a nice Youtube tutorial (see here), explaining how to install TensorFlow GPU. Although it describes different versions of the relevant components (including TensorFlow itself), the installation steps are generally the same with this tutorial.
Before proceeding to install TensorFlow GPU, you need to make sure that your system can satisfy the following requirements:
Prerequisites |
|---|
Nvidia GPU (GTX 650 or newer) |
CUDA Toolkit v10.0 |
CuDNN 7.6.5 |
Anaconda with Python 3.7 (Optional) |
Install CUDA Toolkit
Install CUDNN
Create a user profile if needed and log in
Download cuDNN v7.6.5 Library for Windows 10
Extract the contents of the zip file (i.e. the folder named
cuda) inside<INSTALL_PATH>\NVIDIA GPU Computing Toolkit\CUDA\v10.0\, where<INSTALL_PATH>points to the installation directory specified during the installation of the CUDA Toolkit. By default<INSTALL_PATH>=C:\Program Files.
Create a user profile if needed and log in
Download cuDNN v7.6.5 Library for Linux
Follow the instructions under Section 2.3.1 of the CuDNN Installation Guide to install CuDNN.
Environment Setup
Go to Start and Search “environment variables”
Click “Edit the system environment variables”. This should open the “System Properties” window
In the opened window, click the “Environment Variables…” button to open the “Environment Variables” window.
Under “System variables”, search for and click on the
Pathsystem variable, then click “Edit…”Add the following paths, then click “OK” to save the changes:
<INSTALL_PATH>\NVIDIA GPU Computing Toolkit\CUDA\v10.0\bin<INSTALL_PATH>\NVIDIA GPU Computing Toolkit\CUDA\v10.0\libnvvp<INSTALL_PATH>\NVIDIA GPU Computing Toolkit\CUDA\v10.0\extras\CUPTI\libx64<INSTALL_PATH>\NVIDIA GPU Computing Toolkit\CUDA\v10.0\cuda\bin
As per Section 7.1.1 of the CUDA Installation Guide for Linux, append the following lines to ~/.bashrc:
# CUDA related exports
export PATH=/usr/local/cuda-10.0/bin${PATH:+:${PATH}}
export LD_LIBRARY_PATH=/usr/local/cuda-10.0/lib64${LD_LIBRARY_PATH:+:${LD_LIBRARY_PATH}}
Update your GPU drivers (Optional)
If during the installation of the CUDA Toolkit (see Install CUDA Toolkit) you selected the Express Installation option, then your GPU drivers will have been overwritten by those that come bundled with the CUDA toolkit. These drivers are typically NOT the latest drivers and, thus, you may wish to updte your drivers.
Select your GPU version to download
Install the driver for your chosen OS
Create a new Conda virtual environment
Open a new Terminal window
Type the following command:
conda create -n tensorflow_gpu pip python=3.7
The above will create a new virtual environment with name
tensorflow_gpuNow lets activate the newly created virtual environment by running the following in the Anaconda Promt window:
activate tensorflow_gpu
Once you have activated your virtual environment, the name of the environment should be displayed within brackets at the beggining of your cmd path specifier, e.g.:
(tensorflow_gpu) C:\Users\sglvladi>
Install TensorFlow GPU for Python
Open a new Terminal window and activate the tensorflow_gpu environment (if you have not done so already)
Once open, type the following on the command line:
pip install --upgrade tensorflow-gpu==1.14
Wait for the installation to finish
Test your Installation
Open a new Terminal window and activate the tensorflow_gpu environment (if you have not done so already)
Start a new Python interpreter session by running:
pythonOnce the interpreter opens up, type:
>>> import tensorflow as tf
If the above code shows an error, then check to make sure you have activated the tensorflow_gpu environment and that tensorflow_gpu was successfully installed within it in the previous step.
Then run the following:
>>> hello = tf.constant('Hello, TensorFlow!')
>>> sess = tf.Session()
Once the above is run, you should see a print-out similar (but not identical) to the one bellow:
2019-11-25 07:20:32.415386: I tensorflow/stream_executor/platform/default/dso_loader.cc:44] Successfully opened dynamic library nvcuda.dll
2019-11-25 07:20:32.449116: I tensorflow/core/common_runtime/gpu/gpu_device.cc:1618] Found device 0 with properties:
name: GeForce GTX 1070 Ti major: 6 minor: 1 memoryClockRate(GHz): 1.683
pciBusID: 0000:01:00.0
2019-11-25 07:20:32.455223: I tensorflow/stream_executor/platform/default/dlopen_checker_stub.cc:25] GPU libraries are statically linked, skip dlopen check.
2019-11-25 07:20:32.460799: I tensorflow/core/common_runtime/gpu/gpu_device.cc:1746] Adding visible gpu devices: 0
2019-11-25 07:20:32.464391: I tensorflow/core/platform/cpu_feature_guard.cc:142] Your CPU supports instructions that this TensorFlow binary was not compiled to use: AVX2
2019-11-25 07:20:32.472682: I tensorflow/core/common_runtime/gpu/gpu_device.cc:1618] Found device 0 with properties:
name: GeForce GTX 1070 Ti major: 6 minor: 1 memoryClockRate(GHz): 1.683
pciBusID: 0000:01:00.0
2019-11-25 07:20:32.478942: I tensorflow/stream_executor/platform/default/dlopen_checker_stub.cc:25] GPU libraries are statically linked, skip dlopen check.
2019-11-25 07:20:32.483948: I tensorflow/core/common_runtime/gpu/gpu_device.cc:1746] Adding visible gpu devices: 0
2019-11-25 07:20:33.181565: I tensorflow/core/common_runtime/gpu/gpu_device.cc:1159] Device interconnect StreamExecutor with strength 1 edge matrix:
2019-11-25 07:20:33.185974: I tensorflow/core/common_runtime/gpu/gpu_device.cc:1165]      0
2019-11-25 07:20:33.189041: I tensorflow/core/common_runtime/gpu/gpu_device.cc:1178] 0:   N
2019-11-25 07:20:33.193290: I tensorflow/core/common_runtime/gpu/gpu_device.cc:1304] Created TensorFlow device (/job:localhost/replica:0/task:0/device:GPU:0 with 6358 MB memory) -> physical GPU (device: 0, name: GeForce GTX 1070 Ti, pci bus id: 0000:01:00.0, compute capability: 6.1)
Finally, run the following:
>>> print(sess.run(hello))
b'Hello, TensorFlow!'
TensorFlow Models Installation
Now that you have installed TensorFlow, it is time to install the models used by TensorFlow to do its magic.
Install Prerequisites
Building on the assumption that you have just created your new virtual environment (whether that’s tensorflow_cpu, tensorflow_gpu or whatever other name you might have used), there are some packages which need to be installed before installing the models.
Prerequisite packages |
|
|---|---|
Name |
Tutorial version-build |
pillow |
6.2.1-py37hdc69c19_0 |
lxml |
4.4.1-py37h1350720_0 |
jupyter |
1.0.0-py37_7 |
matplotlib |
3.1.1-py37hc8f65d3_0 |
opencv |
3.4.2-py37hc319ecb_0 |
pathlib |
1.0.1-cp37 |
The packages can be installed using conda by running:
conda install <package_name>(=<version>) <package_name>(=<version>) ... <package_name>(=<version>)
where <package_name> can be replaced with the name of the package, and optionally the package version can be specified by adding the optional specifier =<version> after <package_name>. For example, to simply install all packages at their latest versions you can run:
conda install pillow lxml jupyter matplotlib opencv cython
Alternatively, if you don’t want to use Anaconda you can install the packages using pip:
pip install <package_name>(==<version>) <package_name>(==<version>) ... <package_name>(==<version>)
but you will need to install opencv-python instead of opencv.
Downloading the TensorFlow Models
Note
To ensure compatibility with the chosen version of Tensorflow (i.e. 1.14.0), it is generally recommended to use one of the Tensorflow Models releases, as they are most likely to be stable. Release v1.13.0 is the last unofficial release before v2.0 and therefore is the one used here.
Create a new folder under a path of your choice and name it
TensorFlow. (e.g.C:\Users\sglvladi\Documents\TensorFlow).From your Terminal
cdinto theTensorFlowdirectory.To download the models you can either use Git to clone the TensorFlow Models v.1.13.0 release inside the
TensorFlowfolder, or you can simply download it as a ZIP and extract it’s contents inside theTensorFlowfolder. To keep things consistent, in the latter case you will have to rename the extracted foldermodels-r1.13.0tomodels.You should now have a single folder named
modelsunder yourTensorFlowfolder, which contains another 4 folders as such:
TensorFlow
└─ models
    ├── official
    ├── research
    ├── samples
    └── tutorials
Protobuf Installation/Compilation
The Tensorflow Object Detection API uses Protobufs to configure model and training parameters. Before the framework can be used, the Protobuf libraries must be downloaded and compiled.
This should be done as follows:
Head to the protoc releases page
Download the latest
protoc-*-*.ziprelease (e.g.protoc-3.11.0-win64.zipfor 64-bit Windows)Extract the contents of the downloaded
protoc-*-*.zipin a directory<PATH_TO_PB>of your choice (e.g.C:\Program Files\Google Protobuf)Extract the contents of the downloaded
protoc-*-*.zip, insideC:\Program Files\Google ProtobufAdd
<PATH_TO_PB>to yourPathenvironment variable (see Environment Setup)In a new Terminal 1,
cdintoTensorFlow/models/research/directory and run the following command:# From within TensorFlow/models/research/ protoc object_detection/protos/*.proto --python_out=.
Important
If you are on Windows and using Protobuf 3.5 or later, the multi-file selection wildcard (i.e *.proto) may not work but you can do one of the following:
# From within TensorFlow/models/research/
Get-ChildItem object_detection/protos/*.proto | foreach {protoc "object_detection/protos/$($_.Name)" --python_out=.}
# From within TensorFlow/models/research/
for /f %i in ('dir /b object_detection\protos\*.proto') do protoc object_detection\protos\%i --python_out=.
- 1
NOTE: You MUST open a new Terminal for the changes in the environment variables to take effect.
Adding necessary Environment Variables
Install the
Tensorflow\models\research\object_detectionpackage by running the following fromTensorflow\models\research:# From within TensorFlow/models/research/ pip install .
Add research/slim to your
PYTHONPATH:
Go to Start and Search “environment variables”
Click “Edit the system environment variables”. This should open the “System Properties” window
In the opened window, click the “Environment Variables…” button to open the “Environment Variables” window.
Under “System variables”, search for and click on the
PYTHONPATHsystem variable,If it exists then click “Edit…” and add
<PATH_TO_TF>\TensorFlow\models\research\slimto the listIf it doesn’t already exist, then click “New…”, under “Variable name” type
PYTHONPATHand under “Variable value” enter<PATH_TO_TF>\TensorFlow\models\research\slim
Then click “OK” to save the changes:
The Installation docs suggest that you either run, or add to ~/.bashrc file, the following command, which adds these packages to your PYTHONPATH:
# From within tensorflow/models/research/
export PYTHONPATH=$PYTHONPATH:<PATH_TO_TF>/TensorFlow/models/research/slim
where, in both cases, <PATH_TO_TF> replaces the absolute path to your TensorFlow folder. (e.g. <PATH_TO_TF> = C:\Users\sglvladi\Documents if TensorFlow resides within your Documents folder)
COCO API installation (Optional)
The pycocotools package should be installed if you are interested in using COCO evaluation metrics, as discussed in Evaluating the Model (Optional).
Run the following command to install pycocotools with Windows support:
pip install git+https://github.com/philferriere/cocoapi.git#subdirectory=PythonAPI
Note that, according to the package’s instructions, Visual C++ 2015 build tools must be installed and on your path. If they are not, make sure to install them from here.
Download cocoapi to a directory of your choice, then make and copy the pycocotools subfolder to the Tensorflow/models/research directory, as such:
git clone https://github.com/cocodataset/cocoapi.git
cd cocoapi/PythonAPI
make
cp -r pycocotools <PATH_TO_TF>/TensorFlow/models/research/
Note
The default metrics are based on those used in Pascal VOC evaluation.
To use the COCO object detection metrics add
metrics_set: "coco_detection_metrics"to theeval_configmessage in the config file.To use the COCO instance segmentation metrics add
metrics_set: "coco_mask_metrics"to theeval_configmessage in the config file.
Test your Installation
Open a new Terminal window and activate the tensorflow_gpu environment (if you have not done so already)
cdintoTensorFlow\models\research\object_detectionand run the following command:# From within TensorFlow/models/research/object_detection jupyter notebook
This should start a new
jupyter notebookserver on your machine and you should be redirected to a new tab of your default browser.Once there, simply follow sentdex’s Youtube video to ensure that everything is running smoothly.
When done, your notebook should look similar to the image bellow:
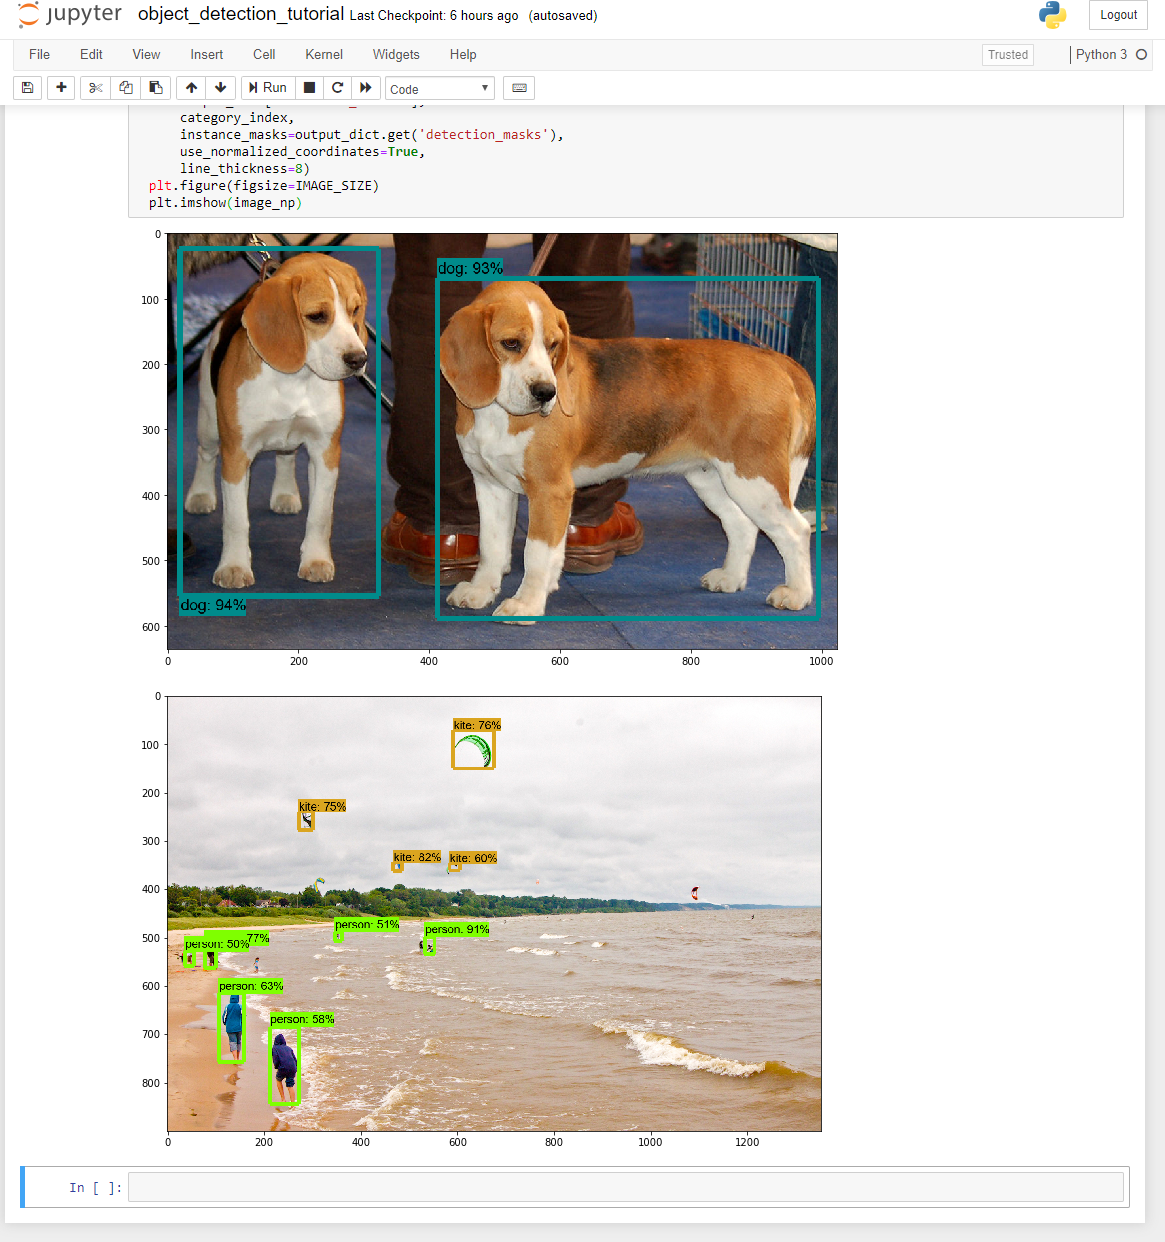
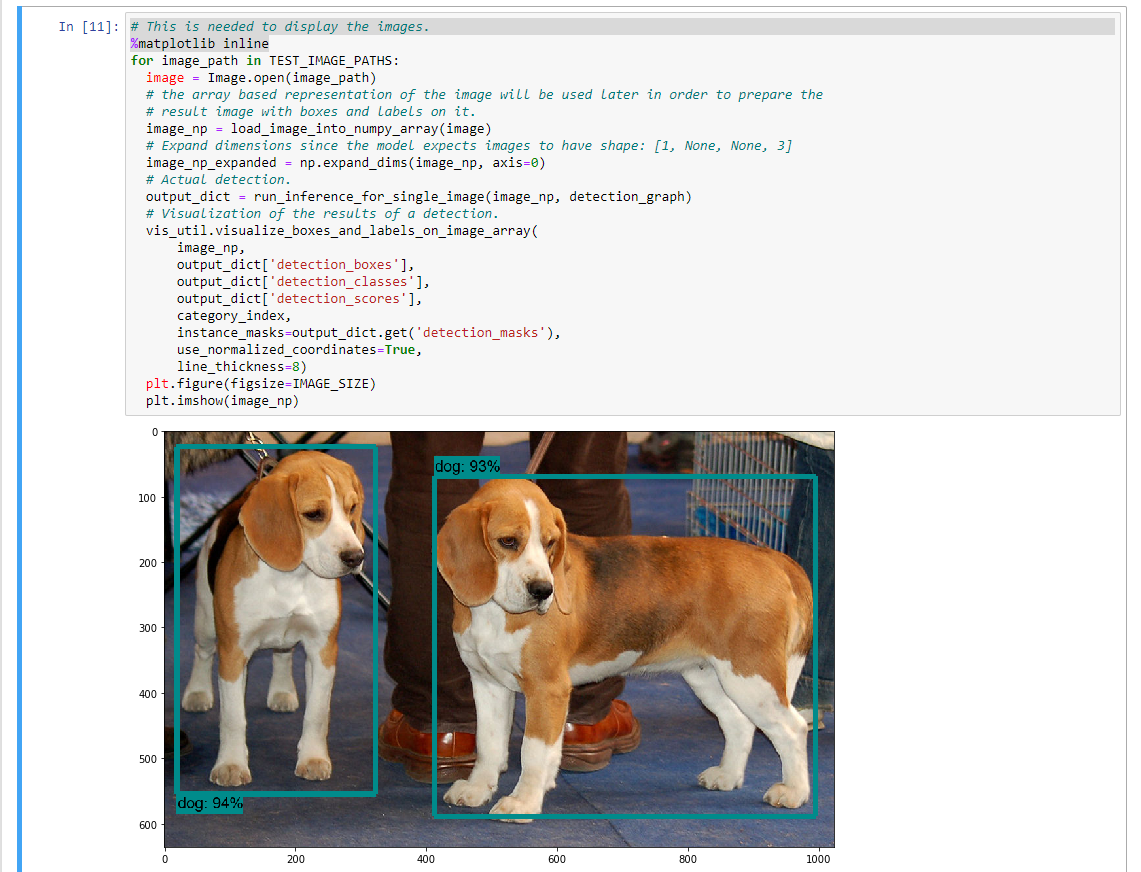
Important
If no errors appear, but also no images are shown in the notebook, try adding
%matplotlib inlineat the start of the last cell, as shown by the highlighted text in the image bellow:
If Python crashes when running the last cell, have a look at the Terminal window you used to run
jupyter notebookand check for an error similar (maybe identical) to the one below:2018-03-22 03:07:54.623130: E C:\tf_jenkins\workspace\rel-win\M\windows-gpu\PY\36\tensorflow\stream_executor\cuda\cuda_dnn.cc:378] Loaded runtime CuDNN library: 7101 (compatibility version 7100) but source was compiled with 7003 (compatibility version 7000). If using a binary install, upgrade your CuDNN library to match. If building from sources, make sure the library loaded at runtime matches a compatible version specified during compile configuration.
If the above line is present in the printed debugging, it means that you have not installed the correct version of the cuDNN libraries. In this case make sure you re-do the Install CUDNN step, making sure you instal cuDNN v7.6.5.
LabelImg Installation
There exist several ways to install labelImg. Below are 3 of the most common.
Get from PyPI (Recommended)
Open a new Terminal window and activate the tensorflow_gpu environment (if you have not done so already)
Run the following command to install
labelImg:
pip install labelImg
labelImgcan then be run as follows:
labelImg
# or
labelImg [IMAGE_PATH] [PRE-DEFINED CLASS FILE]
Use precompiled binaries (Easy)
Precompiled binaries for both Windows and Linux can be found here .
Installation is the done in three simple steps:
Inside you
TensorFlowfolder, create a new directory, name itaddonsand thencdinto it.Download the latest binary for your OS from here. and extract its contents under
Tensorflow/addons/labelImg.You should now have a single folder named
addons\labelImgunder yourTensorFlowfolder, which contains another 4 folders as such:
TensorFlow
├─ addons
│   └── labelImg
└─ models
    ├── official
    ├── research
    ├── samples
    └── tutorials
labelImgcan then be run as follows:
# From within Tensorflow/addons/labelImg
labelImg
# or
labelImg [IMAGE_PATH] [PRE-DEFINED CLASS FILE]
Build from source (Hard)
The steps for installing from source follow below.
1. Download labelImg
Inside you
TensorFlowfolder, create a new directory, name itaddonsand thencdinto it.To download the package you can either use Git to clone the labelImg repo inside the
TensorFlow\addonsfolder, or you can simply download it as a ZIP and extract it’s contents inside theTensorFlow\addonsfolder. To keep things consistent, in the latter case you will have to rename the extracted folderlabelImg-mastertolabelImg. 2You should now have a single folder named
addons\labelImgunder yourTensorFlowfolder, which contains another 4 folders as such:
TensorFlow
├─ addons
│   └── labelImg
└─ models
    ├── official
    ├── research
    ├── samples
    └── tutorials
2. Install dependencies and compiling package
Open a new Terminal window and activate the tensorflow_gpu environment (if you have not done so already)
cdintoTensorFlow\addons\labelImgand run the following commands:conda install pyqt=5 pyrcc5 -o libs/resources.py resources.qrc
sudo apt-get install pyqt5-dev-tools
sudo pip install -r requirements/requirements-linux-python3.txt
make qt5py3
3. Test your installation
Open a new Terminal window and activate the tensorflow_gpu environment (if you have not done so already)
cdintoTensorFlow\addons\labelImgand run the following command:# From within Tensorflow/addons/labelImg python labelImg.py # or python labelImg.py [IMAGE_PATH] [PRE-DEFINED CLASS FILE]